Where do I start with learning pull ups?
Are you struggling with your first pull-up?
You're not alone. Mastering a pull-up takes more than just brute strength; it requires proper technique and the right training progression.
This guide is tailored to help you achieve your first pull-up with impeccable form.
We'll be diving into different stages of progression that build up to a successful pull-up.
The Importance of Proper Technique in pull up progressions
Before we begin, it's crucial to understand the importance of technique in pull-ups.
Proper form not only reduces the risk of injury but also ensures that you are engaging the correct muscle groups. If you haven't already, check out our previous post on pull-up technique to get the basics right.
MUSCLES TRAINED TO PROGRESS PULL UPS
LATISSIMUS DORSI
The pull-up kicks off from a dead hang and involves a smooth vertical ascent, finishing only when your chest grazes the bar.
Central to this movement are the latissimus dorsi muscles, or 'lats'—those expansive, fan-shaped muscles that are crucial for drawing the upper arm down and toward the body’s midline.
They’re particularly vital during the initial and middle stages of the pull-up, ensuring a strong, fluid motion throughout.
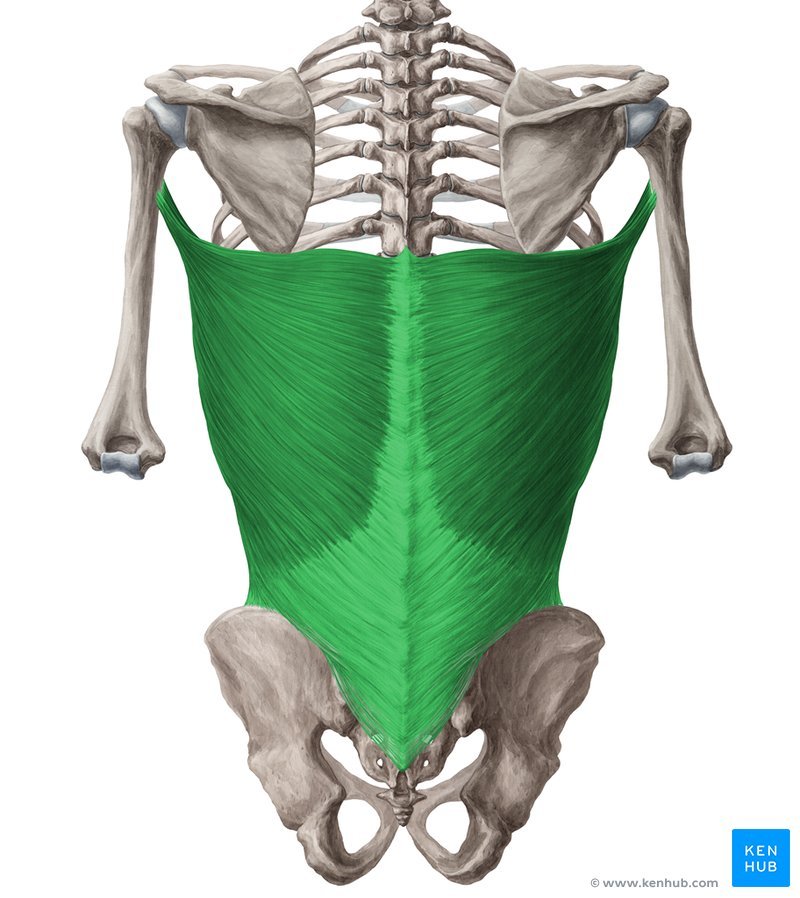
Latissimus Dorsi - Pull Up Progression
TRAPEZIUS
The trapezius muscle, commonly known as the 'traps,' is divided into three distinct parts, each with its unique function.
The upper fibers are tasked with shrugging movements, the middle fibers pull the shoulder blades together, and the lower fibers draw the shoulder blades downward.
During a pull-up, the middle and lower fibers are especially active, as the goal is to keep the shoulder blades both retracted and depressed.
This positioning is crucial for a powerful and effective pull-up.
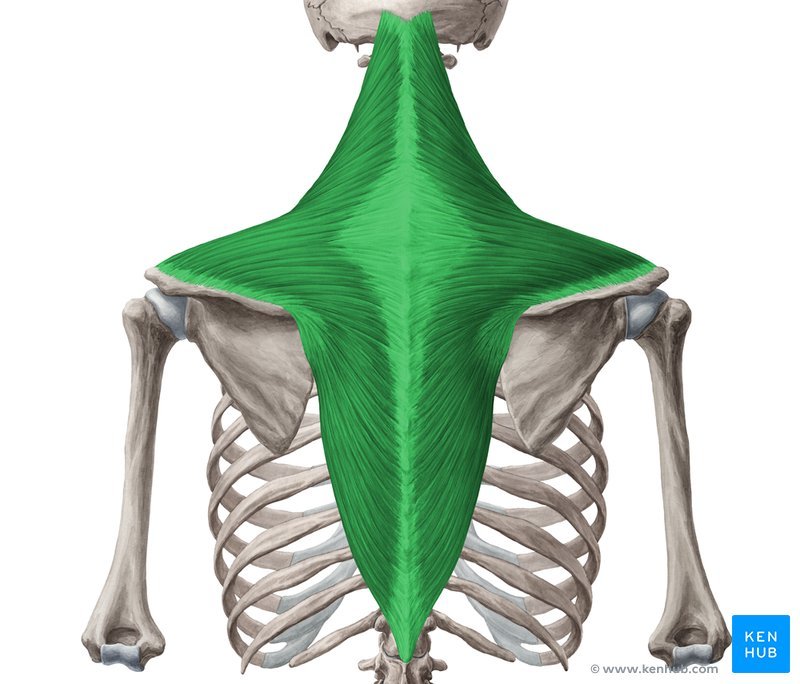
Trapezius - Pull Up Progression
RHOMBOIDS
The rhomboids, both minor and major, function to draw the shoulder blades together and also assist in the downward rotation of the scapula.
In synergy with the trapezius muscles, the rhomboids help maintain a stable shoulder blade position, which is essential for pulling your chest up to the bar effectively.
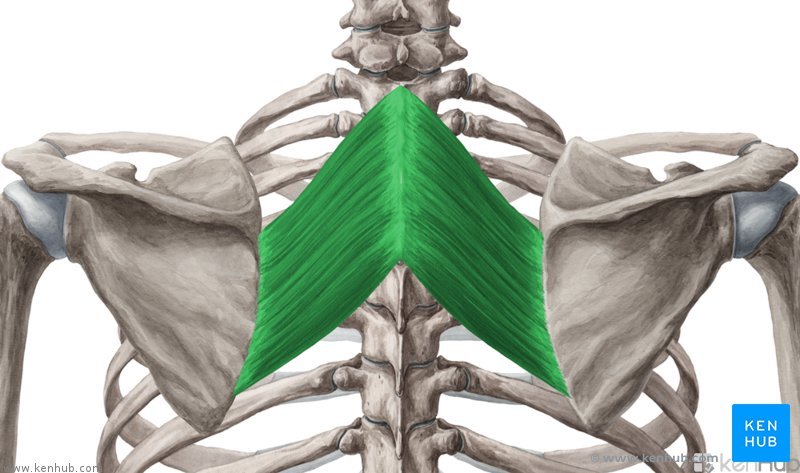
Rhomboids - Pull Up Progression
REAR DELTOIDS
The rear deltoids, often referred to as 'rear delts,' act as hyperextenders of the shoulder.
This action becomes crucial as you approach the top of a pull-up, where maximizing height is key.
Therefore, strengthening the rear delts is essential for successfully achieving a chest-to-bar pull-up.
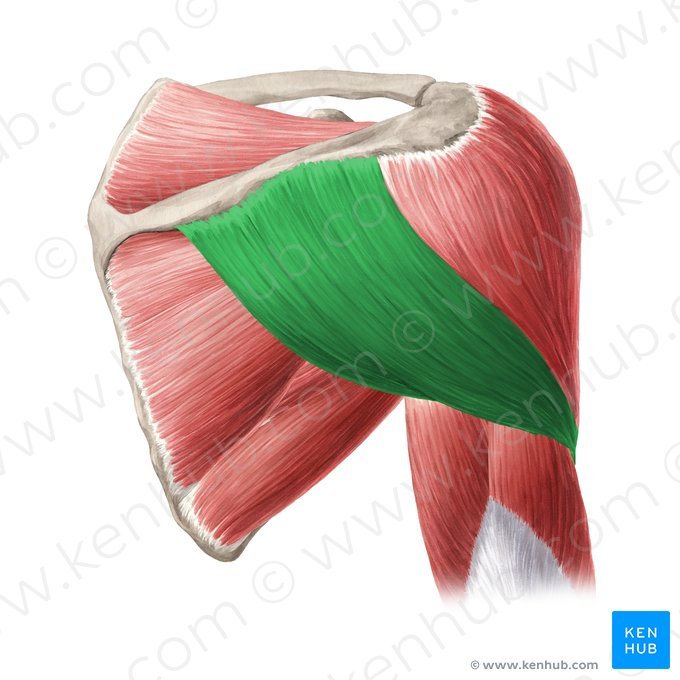
Rear Deltoids - Pull Up Progression
Now that we understand which muscles are to be used, let’s talk through how to progress through the movements, so that you can train these muscles, improve your stability and achieve a clean chest to bar pull up.
Stage 1: Body Row (Australian pull up)
What is it?
Sometimes called an "Australian pull-up," the body row is an excellent starting point to develop pulling strength.
This will target the lats, but will also work well to target the traps, rhomboids and rear delts, which are common limiting factors in a pull up.
How to do it:
Set the bar level with your belly button.
Grab onto the bar, slightly wider than shoulder-width.
Start with your belly touching the bar, walk forward while maintaining tension, and perform the row.
Key Point: Maintain a hollow body position throughout the movement to build strength effectively.
Stage 2: The Supported Pull-Up
What is it?
The supported pull-up helps you get accustomed to pulling your own body weight towards a bar. Given that it’s a vertical pulling movement, the lats will be focused on and isolated more than a row.
How to do it:
Set the bar at shoulder height.
Stand below the bar, feet slightly forward.
Lower yourself into a dead hang before pulling yourself up until your chest touches the bar.
Key Point: Keep tension throughout the movement.
Stage 3: The Banded Negative Pull-Up
What is it?
Negatives are great for developing pull-up strength. However, they can be challenging. Using a band can make the transition easier.
How to do it:
Loop a resistance band around the pull-up bar.
Perform the negative part of the pull-up, focusing on a slow, controlled descent.
Key Point: Start with a thicker band and work your way down as you build strength.
Goal: Build up to a 7-second negative with the band.
Stage 4: The Full Negative Pull-Up
What is it?
Once you've mastered the banded negative, it's time to take on the full negative pull-up. This will prepare your muscles for the entire range of motion in a regular pull-up.
How to do it:
Stand on a platform or a barbell set up beneath the pull-up bar.
Jump or step up to get your chest close to the bar.
From the top position, lower yourself down in a controlled manner, without any band assistance.
Key Point: Start by aiming for a 3-4 second negative and progressively build your way up to a full 7-second negative. The slower descent increases time under tension, which is key for muscle development and strength.
Conclusion
Once you've gone through all these stages and built up to 10 reps in each, you're ready to attempt your first pull-up. For further guidance, refer to our technique video to ensure your form is spot-on.